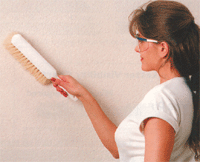
1) Clean the installation surface of any dirt or debris with a shop brush.
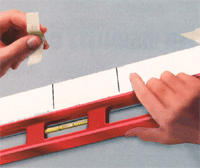
2) Position the spacing tape on the wall and secure one end with masking tape. Unroll, level and tape the other end. Spacing tapes show the general position of each letter and are available free upon request.
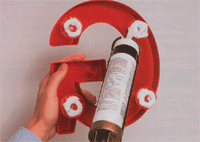
3) Screw the studs into the stud holes on the back of each letter. Now fill the drill holes in the wall of the first letter with silicone.

4) Continue with the remainder of the letters, and allow the silicone to cure for at least 10 minutes before removing the masking tape.
Shop, compare and order from over 15,000 sign letters, metal sign letters, cast metal sign letters, acrylic sign letters, plastic sign letters,
custom sign letters, foam sign letters and changeable sign letters - for all types of uses that are easy to install. Custom Exterior Signs,
custom interior signs, custom lobby signs, custom business signs, plaques, church signs, school signs, military signs, government signs
and retail signs - we’ve got you covered.
Call us with all of your signage questions, our friendly signage experts are here to help you.